Showing posts with label staff. Show all posts

Wednesday, January 26, 2022

Teaching Melody and Melodic Contour

On a recent poll, music teachers were asked what they struggle the most with and melody and melodic contour was the top answer. So, I spent my morning while home sick with Covid, yup, it has finally arrived - gave it my best shot - 3 in fact, but it hit my family this week and you know me, I can't sit still. I have been working on this for a while and this is a Patreon exclusive.  This is a 24-page mini-book available for less than the cost of Starbucks. You also get access to everything already posted there and I continue to add new material weekly. There are monthly mini-workshops and opportunities to work with me 1:1 to delve deeper into organization, lesson planning, behavior management, or anything else you might be interested in. 

So, this mini-book includes lessons, activities, and ideas about teaching Melody and Melodic Contour. There are twelve children's books listed with several lessons from my Playful Possibilities and Painted Music books. Ideas on using manipulatives, songs, games, and instruments and many other things are part of the mini-book.

Check it out today, click here.

Here is a sampling:


Enjoy,


Thursday, October 10, 2019

Make and Take Workshop

Recently I organized and hosted a workshop for our local Orff Chapter.  It wasn't my typical workshop of singing, speaking, moving, creating, and playing, but a Make and Take. The workshop was inspired by the St. Louis, MO chapter who hosted one last school year. 
A Make and Take workshop is where participants come to make manipulatives for the classroom, explore how to use them, and take them home.


 Our local chapter has been struggling for a few years and I was hoping this would bring our chapter together and boost membership.  It did- we had 37 teachers sign up and many new members!  
Interested in having a Make and Take Workshop?  Here is what I did:

1. It's All in the Details

Date of workshop, time (I would recommend 4 hours), and place.  You will need a space large enough for tables, chairs, and materials.  We used our library and it was a perfect space as there were auxiliary areas we could use for specific projects that needed hot glue.  We charged for materials only but wouldn't know the specific cost per person until everyone registered. There was a cut-off date for registration and we had several people inquire after the cut-off date.  I did not charge a fee for hosting or presenting so it truly was a "materials only" fee.  I let everyone know the cost would be no more than $40.00 per person and chose projects and materials accordingly. 

2. Project Choice

 I wanted a variety of projects that I use frequently and that students enjoy; some rhythmic, some melodic, games, instrument recognition, etc.  I also wanted some material heavy projects and some paper projects.  The participants needed to be able to take the items home immediately, so nothing that needed significant dry time (paint, wet glue, etc.).
I narrowed down my initial list to six projects with an "extra goodie" of some apple erasers:
No photo description available.
  • Top left corner - Bundles of Joy (activity from Artie Almeida) and Noteman (activity from local chapter members Shari and Ashley)
Materials:  150 pipe cleaners per person to make a class set of 25 Bundles, scissors, one large baggie.


  • Top right corner - Music Memory/Concentration Game


Materials:  Cardstock and 2 sets of (color) printed sheets of game pieces, glue stick, scissors, one small baggie.
Game pieces available with and without names of instruments:


  • Middle Right - Apple Erasers to use with song, "Apple Tree"
Materials: Apple erasers purchased from Target Dollar Spot, one small baggie.

  • Bottom Right - Rhythm Dice and Roll & Create Rhythm Worksheets (not pictured) 

Materials:  Foam Counting Dice - one pack per participant
 FREE download of Worksheets , Sharpies and small baggies.

  • Bottom Middle and Bottom Left - Rhythm and Melodic Monster Magnets

Original idea here from Elizabeth at Organized Chaos.

Materials:  Tin Cookie Sheet, 1/8" Grid Tape  , Magnet Circles(Or Pom Poms), Googly Eyes, Hot Glue (we used Gorilla Glue hot glue sticks).  Everyone made 8 cookie sheets with 64 magnets.  Each cookie sheet needed an accompanying baggie with 8 "monster magnets"; 3 eighth notes (2 small googly eyes on each), 3 quarter notes (1 big googly eye on each), and 2 rests (no googly eyes), scissors, hot glue guns.

  • Middle Left - Solfege Texting Sticks

Materials:  25 Large Craft Sticks per person, 2.5 pages of printed solfege papers, scissors, glue sticks, one small baggie.


  • Middle -  Kaboom Game

Materials:  One plastic cup per person, 25 regular colored craft sticks per person, ball point pens (sharpies bleed on the wooden craft sticks), one large baggie.

 3. Order Materials, Determine Costs Per Person.  I ordered everything myself as our chapter is struggling, then I communicated costs to all who had signed up and asked for payment.  Our costs came to $29.76 per person!  

4.  Helpers!

Get everything ready and try to separate as much as possible - I put the 64 magnets each in a big baggie and had helpers at the workshop an hour before to get everything laid out and separated so materials would be easy to pick up and count out.  I also put signs above each material to let people know what they would need and a visual of what the finished project should look like.

 5.  Participants Arrive

Once everyone was present, I quickly went over where materials were (scissors, glue, and pens/Sharpies were on a separate table, hot glue station was in a different room, etc.), showed the visuals, reviewed the projects and let them know we would spend the last 30 minutes going over materials and how they would be used. This 30 minute time at the end was when I went over the Apple Tree game with the apple erasers, demonstrated how they could also turn these into magnets by gluing mini magnets on the back and use the cookie sheet boards to show the melody. 
I also had a QR code to scan as participants came in which had a pdf of all directions, links to projects, visuals, and many extras to use to make more manipulatives at home.  This was helpful as several used this document throughout the workshop to make sure they understood the project directions and final product. 

It was a very successful workshop and I enjoyed the conversations with other music teachers. We rarely get time to sit and chat with each other and many others commented on how nice it was to have time to "talk shop" while at a workshop.  I encourage you to give it a go! 
Let me know if you have questions.

Tuesday, January 8, 2019

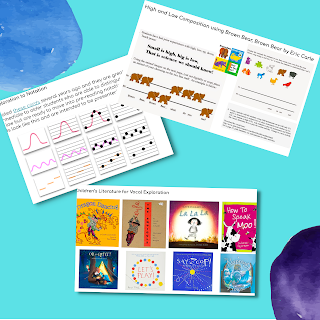
How do you "do" vocal dictation/exploration within your classroom?

1.  I posted a video on my facebook site - @o for tuna orff  this morning so go check out some other things to do.  Check it out here!


2.  Vocal Exploration to Staff Notation

Click here for previous blog posts about vocal exploration including these (there are 113 slides in the set and it is FREE!).


3. Vocal Exploration Cards and Ideas

Bushfire Press also has a set of free cards and several ideas here.

4. Winter Vocal Exploration Cards

Another set of vocal exploration cards, these are from a Winter Set I made. Again, FREE!


5.  More and More!

My friend, Jennifer, from Yellow Brick Road blog, has a great blog post about why and how as well as several fun activities to explore. Check it out here. 

So, how do you "do" vocal exploration?

Wednesday, February 17, 2016

The BIG One.. We're Talkin' Assessment!

I am linking up today with Elizabeth over at Caldwell Organized Chaos today for a linky party with other music educator bloggers! 

I don't know about you but at this point in the school year I am suddenly shocked at how little time we have left in school!  We are finished at the end of May and with Spring Break and holidays/workdays we only have 7 full weeks of school remaining.  Now, there are several weeks of half days/workdays and holidays, but it is striking to realize how time is slipping away!  So that leads me to the post today; a check in of sorts, several assessments I use in the music classroom. 
I have posted about this previously with other activities here.
I have posted this one before and just used it this week with Jr. Kinder. and Kindies and I always somehow forget how very much they love this!
What Sound Do You Hear Now


Stretchy Band Assessment
This is the time for a little silliness as well as seeing how well your students understand and can internalize rhythmic concepts. I use this with first grade on up; first grade quarter/eighth/rests, second grade add half note, third and fourth add sixteenth and whole notes. 
1.  Put on some catchy up-tempo music. I particularly love the Hamsterdance Party!  Hilarious and I think it was an Artie Almeida workshop where this idea (and music) was presented. 
2.  Students are holding on to a stretchy band; I made these out of a box of irregular (flawed) white pantyhose.  musicquilt@Hotmail.com.  SOOOOOo easy and very fun to create your own color combinations. I have several small ones and a couple larger ones and use them to mark off my room for instrument groups, or to mark off my room so students don't go to instruments that are set up until I give directions for them to do so, etc. 
Email me for directions on how to make these: 
3.  You are going to be the "caller" and call out "quarter note".  Students will keep the beat by bouncing the band up and down to the beat.  Next call out "rest"; freeze! Then "eighth notes"; I have students alternate hands up and down quickly to the eighth note rhythm, etc.  Half notes; move down to their knees then up over head saying, "one, two, one two", whole notes; down to toes and then up over head saying, "one, two, three, four".  You got it!  Once they get it, switch every 8 beats or so, then switch every 4.  "Now put it in your feet" (march around the circle to the quarter note, or go in for 4, out for 4). Pretty soon you are teaching them a dance, which is fun!  We also switch and put the band behind our backs, play the band like a guitar, do the washing machine (move both hands to one side then the other while holding on with both hands).  Up to the sky, down to the floor, you guessed it, anyway that works while being able to assess who understands rhythmic note concepts and who needs a little more help. 

Necklace Assessments
A few years ago our local Orff chapters in NC and some from SC joined forces to host the National American Orff Schulwerk Association National Conference here in Charlotte.  We had two amazing, courageous, creative teachers who had fabulous, exciting ideas for the teacher boutique.  This was one of them.  Print out rhythms, or staff notation, or dynamic markings, or instrument families, etc. on cardstock, punch holes and put ribbon or yarn around them.  Students put them on like a necklace with note sides facing out.  I use a Garage Band Smart Drum rhythm (a rap track will do) and I say, "quarter note" and throw a ball to someone who has a quarter note.  They wait until I say the next rhythm "rest" and they throw the ball to someone else who has a rest.  Students are not allowed to point to themselves "Me, ME!!!" or else they are out.  Clean and simple, people! Once they have had a turn throwing the ball, they sit down.  This is fun and they love when I trick them; if only quarter notes are standing, I say, "eighth notes" and they are like, "WHAA???".  Haha!
I love using these balls; I made them from yarn and while time consuming to make them, they are the BEST!!! Google yarn ball or large pom pom ball and you'll find instructions.  Also use zip ties in the middle!  I have had these almost 15 years!


Monday, September 28, 2015

Three Things: Syn-Co-Pa Black Snake w/Pop song, Farmyard Beat book, and Recorder Hike

I am joining Mrs. Miracle at her linky party called "Three Things".  We are blogging about three things that have worked very well for our students and classes over the past week. 


#1. Release Me/Poison/Black Snake

I see all students first through fourth grade about twice a week; long story short, 10 day rotating schedule, so some weeks it is once a week (depending on Monday/Friday holidays and inservice days).  The first time I saw fourth graders this week we began the lesson by reviewing ti-ta-ti (Syn-Co-Pa).  I found a pop song called "Release Me" by Zoe Badwi.  It begins (and continues throughout) with a very clear ti-ta-ti ta rest rhythm.  Woo hoo!!! I love finding this kind of a "hook"; pop music that is relatable to the children with an element to pull out and relate to "classroom" music. 
We listened to a bit, added some body percussion, then came the fun!  Woo hoo.. instrument time!! I broke out some of the "big guns" this time; djembes, congas, etc. for skins, log drums, claves, temple blocks and the like for woods, all my crazy shakers (including the goat hooves which are a HUGE favorite!! can you say "Ewwwww!!"), and the last group was tambourines.  A quick review of the instruments and technique, and we were off.  The song is broken down this way: 
  • Intro.   
  • A Section:  16 measures (4 beats per measure)  
  • B Section:  8 measures
  • A
  • B
  • Interlude/Break: 24 measures
  • B
  • A (longer and fades out at end)
 
I pointed to a card that showed "ti-ta-ti ta rest" (eighth, quarter, eighth, quarter rest) and each group played the pattern 4 times, then on to the next group for 4 times, etc.  We went from drums (16 beats = 4 patterns), to tambourines, then shakers, then woods).  During the B Section students rotated to the next group.  Practice one time through before starting the music, rotate, then start the song and students will rotate through all the different instrument groups. 
Whenever we play a rotation game like this I always put 2 more instruments out than students for each group; it eases the "I wanted that and you got it" issues and still provides students with a choice to make.  
  • Intro:  No one plays
  • A: (1st 4 measures, drums, 2nd 4 measures, tambourines, next 4 measures, shakers, final 4 measures, woods)
  • B:  Rotate to the next instrument group
  • A: (same as previous)
  • B:  Rotate
  • Break/Interlude: "Raise Your Hands"; dance party, raise those hands.. have kids mirror you, wave hands side to side, turn around and raise hands, etc.... make it fun.. it's LONG!
  • B:  Rotate
  • A  (same)
  • Coda ... we put instruments down and performed some body percussion. 

Then we played poison with that rhythm pattern, Teacher vs. Students; of course they won, but I didn't make it easy!! :)  Let me know if you are not familiar with how to play, it is my students FAVORITE game EVAH!!!!!

The next class we reviewed the song, "Black Snake" and played the game, determining where the syncopated rhythm occurred, having them jump up and clap it "out of the air".  Funniest thing happened prepping for this class; I had to pack everything in my classroom up this past May as new carpet was being installed. I revamped my room and am still figuring out where "old" things are now in their "new" homes.  I have a black rubber snake I looked everywhere for; about 15 minutes.. wandering around the room literally singing "Black snake, black snake, where are you hiding?".  Just as my class was about to come in I noticed my daughter coming out of the art room across the hall.  She plays in my room with a bunch of other faculty kids in the mornings and so I asked her if she had seen it.  Of course she had!  "It's in the pumpkin, Mama."  Sure enough, there it was!!! Whew.. in the nick of time! 


#2. Farmyard Beat Book

My littles (Junior Kindergarten) are learning about farms.  After singing through Old MacDonald, Listen to the Ducks, and several other farm songs, I pass out "eggs", (shaker eggs).  We wonder what kinds of animals lay eggs, and then I show them the book, "Farmyard Beat" available here.  


After each part in the story (see below for example) there is a part where the animals keep a rhythm "Peep, peep, peep peep, peep" is ta, ta, ti ti, ta, I speak the rhythm first then they "echo say and play".  This is the cutest book and is a fun way to reinforce beat while learning about farm animals.  I also love the playful language; the sheep is the best, "Tat, tat, tattity tat"!


3. Recorder "Hike"

Artie Almeida has some really creative ideas that are a huge hit with students! If you are not familiar with her, get thee to a workshop with her!! You'll be overwhelmed!  Several years ago I was at a workshop with her and she showed us how to have a quick review with students that is very active and a great assessment tool as well.  Put a rap track on, I usually create one in Garage Band with a bass track to give it some sense of melodic direction (in G), students dance/walk/"jam" around the room while the music is playing, stop when it stops.  Show a card like one of these:
Sorry this one is sideways:

I start out with the lettered cards B A G.  Once a card is shown, music back on, dance/jump/jam, then show another card like staff cards (first one pictured above)  Then song cards for songs we have learned like Hot Cross Buns and Buns Cross Hot (retrograde Hot X Buns!!).  We continue to alternate between a card and music. 
I can quickly assess who is "reading notes" and who is looking at the staff above my white board, see pic below, made from black electrical tape and CD's, (which is good as it tells me they are trying to problem solve using the tools available), and who is looking at their neighbors fingers (not so good as they are copying and not problem solving). It gives me a lot of information quickly and the students love the movement.  Sometimes I give them specific movements (depending on the skill set we are working on) such as "skip" if we are working on song material in 6/8, or "ice skate" or "slither" or "swoop" if we are working on half notes.  I can relate back to these movements later in the lesson.  


 I hope you find some of these things useful!  Happy Fall Y'all!

Friday, March 27, 2015

Busy Buzzy Bumblebee

Spring has sprung!  I love seeing all the pink and white cherry blossoms, the daffodils right outside my classroom windows (I have a reading garden right outside my room!), and the vibrant fuschia buds on the redbud trees!  Here in NC we are definitely in bloom!
I have to make a disclaimer on this post:  I can't remember if I've posted this before!  I looked back but couldn't find it so I'm sorry if I posted this a while back.. ah well... :)

I found these oh-so-cute bumblebee finger puppets through Oriental Trading.
 The kids love using them for "Flight of the Bumblebee" and then we use Artie Almeida's bee assessment (envelopes with "quarter note", "rest", and "eighth notes" written on the front and they get cards with the actual note/rest and they fly around like bees while the music plays and put their card in the correct envelope.  It's a great assessment as no one knows who put the correct/incorrect card in the envelope and you quickly know if they have "got it"!  I tell them if they get them all right they earn a point per card, if one is wrong I deduct one point; who will win, me or you?  I act excited if I see one wrong and make a big deal that I "tricked" the class and I got  point, yay for me, etc.  They crack up!!

Then we sing "Busy Buzzy Bumblebee" and I show the powerpoint.  Here are a few cards from the slide show.  If you would like the whole thing I would be happy to share; send an email to me at musicquilt@Hotmail.com and I'll send you the pdf to use with your kiddos!  You can see it moves from keeping the beat (heart slide) to
iconic representation of the rhythm:


and then to melodic representation using bees:


Also included is a slide on teaching ideas with Busy, Buzy.
Happy Spring!

Thursday, October 16, 2014

Creepy Crawly Spider

This is one of my first graders FAVORITE things to do!  It takes a little instruction in order to get them to understand that when they make the yarn web they have to hold onto the string with one hand and roll/gently throw it to another student AND continue to hold on, but once they get it they BEG to do it again. Be sure to keep the beat once they have it.  I have also used it where we sing and roll the yarn.  When the yarn ball reaches a student, I sing, "What will you be for Halloween" on Sol and Mi if major, Do and La if minor (see notes and music on slides 4 and 5) and the student sings back "I will be a witch" or "I will be a dragon", etc., then I sing to someone else  "What will you be for Halloween", that student sings their answer and the game continues with the creepy crawly spider song.  Enjoy!  If you want the pdf, email me at musicquilt@hotmail.com